Overview
This post will take you through my experiment of building a quite powerful travel expense website using Lovable.dev, an AI tool specialized on web site and App generation (this process is called vibe coding, a term coined by Andrej Karpathy in february 2025, cofounder of OpenAI). The entire process took one rainy sunday afternoon and about 20 Euros for a subscription to the AI service. See the result here.
Summary – TL, DR:
I gave clear instructions in normal English language to an AI tool (Lovable.dev) to build a web application that handles travel cost expenses. With a try-and-error approach, this required about 100 prompts until the final application was ready; it covers a handful of screens, a database connection, full user management, multi-language support and even a generated instruction page – far more than the usual template-based sites that website building tools normally generate.
I did not touch a single line of code, but was precise in my instructions. In some cases I had to “restart” a task when the AI tool went into a dead end. The result was linked to my own domain and can be used in production (although the generated React code is not very clean).
I could have been faster if I had specified the entire application and its workflows up-front, instead of adding functions on the way. Still, the result of this “automated site builder” is impressive.
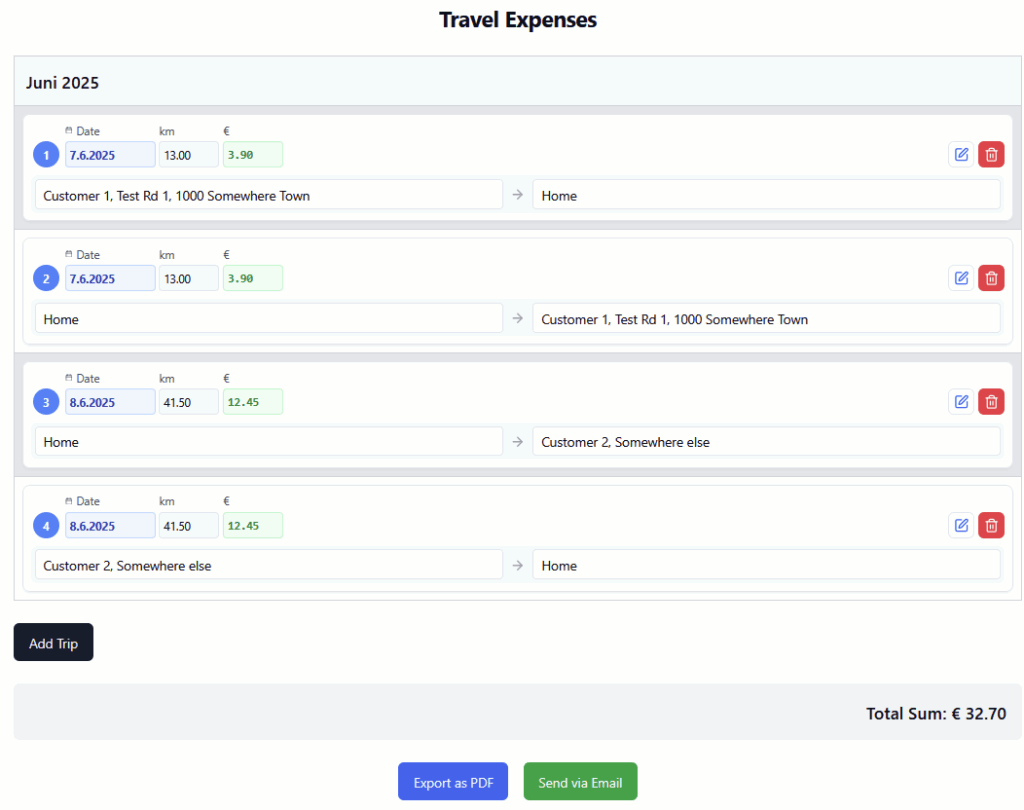
Screenhots
These are screenshots of the final application:
The challenge
The idea
I wanted to play around with an AI code generator and chose Lovable.dev for that. There are other, similar sites such as Replit and others. The principle is always the same: You register and get some free “credits”; for more credits you have to subscribe. Each credit is good for one prompt where the tool has to built something. Basically you tell it what to do, e.g. “Add a user management system where users can register with username and password, receive a confirmation email and – after confirming a link in that email – can log in to the App”. Or a simpler one: “The password strength should be 8 characters”.
The problem to be solved
I needed a real-life problem to solve, not just a “Hello world!” site. My daughter came to help; she works as a caregiver for elderly and disabled people, helping them with daily life, cooking, running errands and in general supporting them. She drives to several locations every day and has to fill out a paper form to get the travel expenses reimbursed (welcome to digitization in Germany…). This is the original paper form (in German, but you can guess what it means: Date; From; To; Distance; Costs):
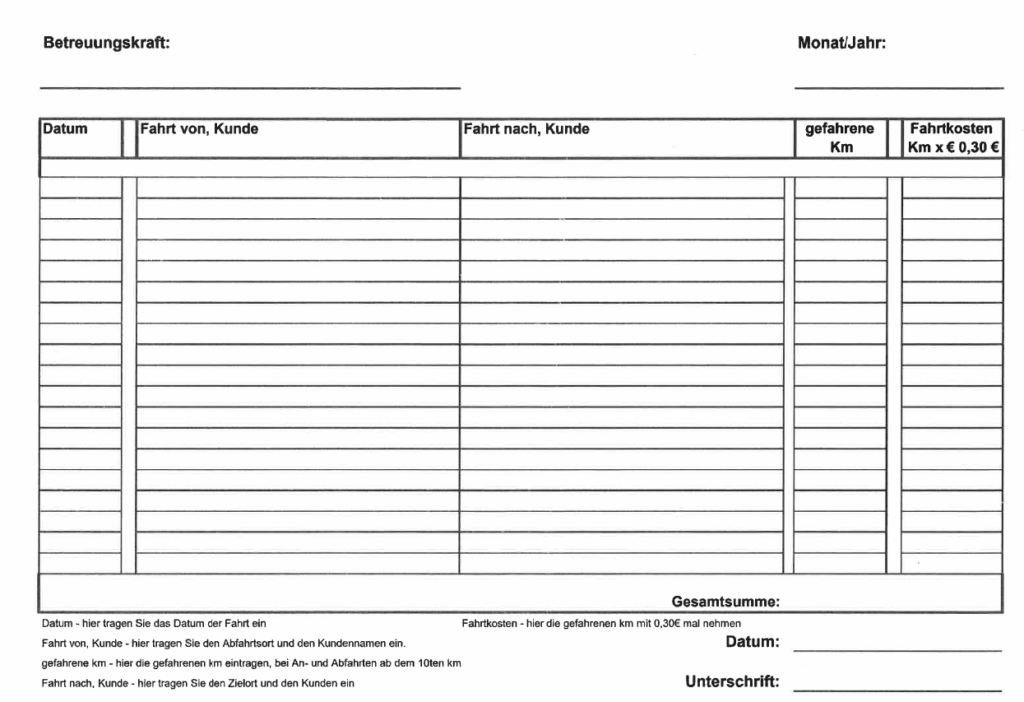
This was my starting point for the AI tool.
Using the AI tool
Starting with some prompts
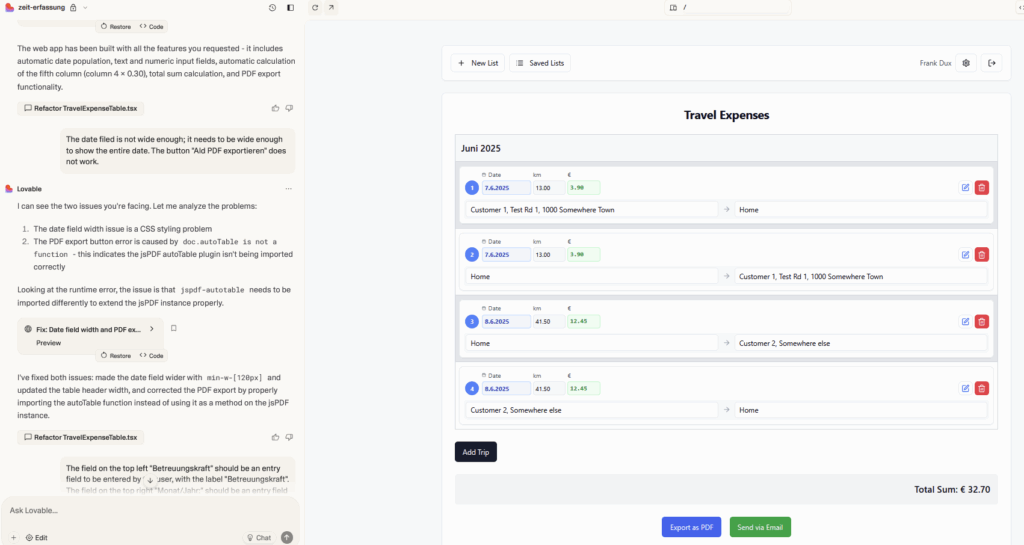
In the tool, you enter your prompt and see the App develop on the screen in realtime. The screenshot below shows a state halfway in the process…
I started with the following prompt:
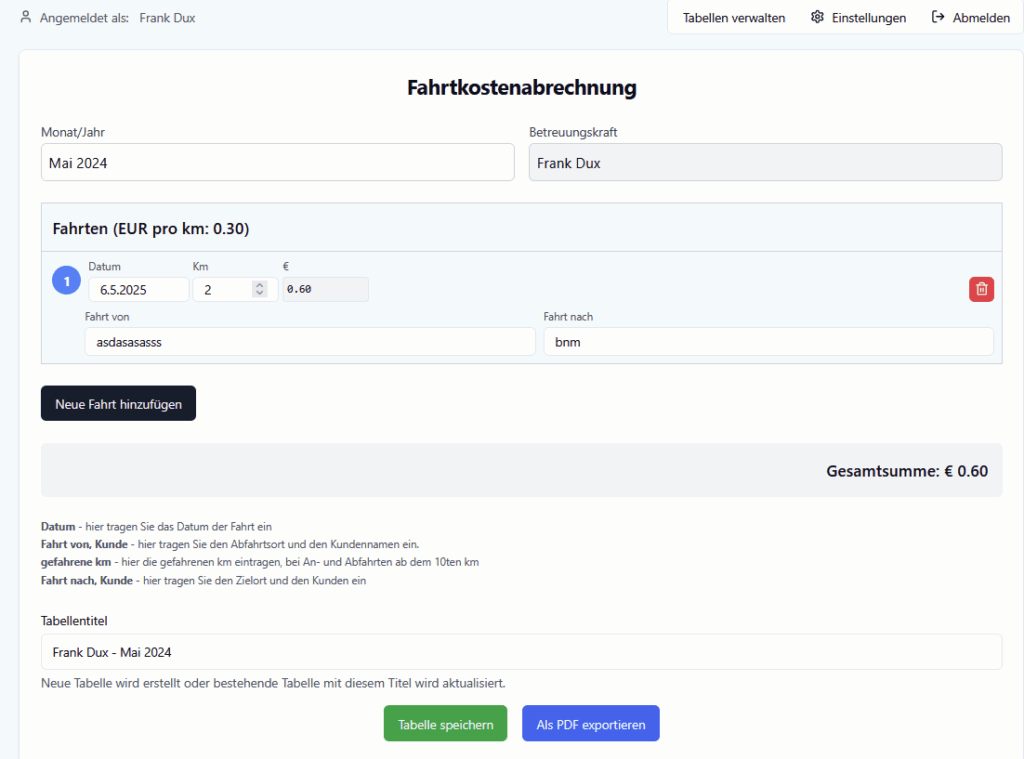
Find attached an image of a table. Build a responsive web app that allows a user to fill in that table. The first column is the date; it should be set automatically with the current date. The second column is a text entry field to be entered by the user. The third column is a text entry field to be entered by the user. The fourth column is a numeric entry field to be entered by the user. The fifth and last column contains numeric values; these are calculated by the web app on the algorithm: value of column 4 of that row multiplied with 0.30. At the bottom of the table is a field "Gesamtsumme" which means "Total sum" in German; this shall be calculated by the web app to hold the sum of all values of the fifth column of all rows. There shall be a button to export the filled table as PDF."The tool detected automatically that this is a travel expense calculation site. There were some errors mainly with the user interface, and the entire PDF export did not work.
The date filed is not wide enough; it needs to be wide enough to show the entire date. The button "Ald PDF exportieren" does not work.
In spite of the typos in my instructions, Lovable understood what I meant and fixed it. We went through a few more minor iterations for fixing styling errors, until the App resembled the paper form. Then we added a major new functionality:
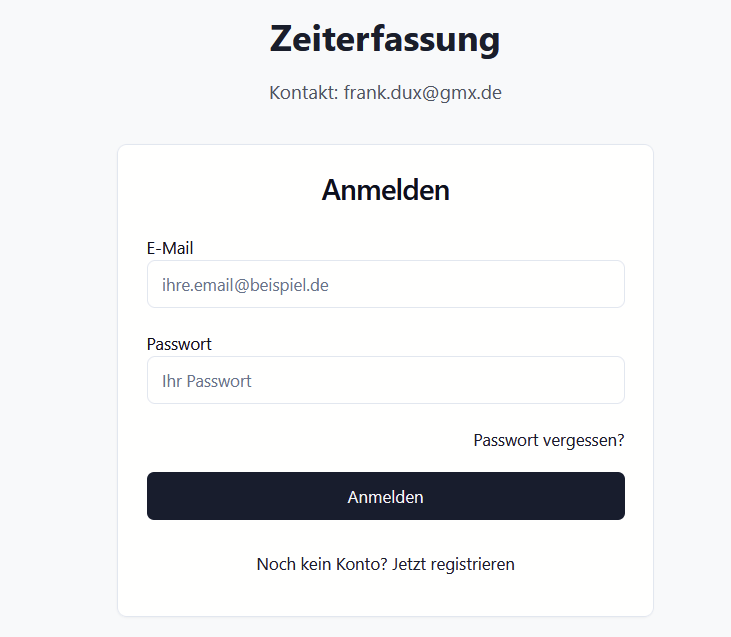
Add a user authentication mechanism. A person should be able to register as a new user with a self-chosen email address, a username and password. He should receive a confirmation email to confirm his registration request. Once confirmed, he should be able to login to the app and see his previously entered data of the table. The value of the "Betreuungskraft" field above the table should be prefilled with the username of the logged in user. It shall still be editable, though. The user should also be able to save a filled table to the database with a defined title (defaulted to value of the "Monat/Jahr" field) and see all saved tables in a list. He should be able to delete a saved table (with a confirmation dialogue) and to create a new table which is empty then.
Going all in
Two problems occured:
- I had run out of credits; the five free credits were used up. So I signed up for a monthly plan that gave me 100 credits (and cost around 20 EUR).
- I needed a database. Lovable works with Supabase, a cloud-based database which can be easily connected. I registered for a free plan which was sufficient.
After re-running my previous prompt, I had user management, but with errors:
For example, login worked, but the user ended up nowhere, not on the main screen we had before. This was fixed with a few prompts and iterations:
There is an error. After successful login, the user is not redirected. He stays on the login screen. He should be redirected to the screen with the latest table he worked on (or the option to create a new table if none exists). Also, on the screen "Gespeicherte Tabellen" there is another button "Gespeicherte Tabellen verwalten". This is unnecessary. Instead that screen should directly contain the overview of saved tables and the options to load one of those.
I had meanwhile turned to adding several instructions into one prompt, separated with “Also, …”. Soon we came to a usable version:
Then I did some UI rework; moving items to different screens, adding functions to edit or delete rows etc.
For better visibility, colour the rows of the table alternately with a light grey or a white background. Make the table title "Fahrten" a bit larger. Make the fields for "Datum", "Gefahrene km" and "Fahrtkosten" smaller so they fit in one row also on a mobile phone in portrait layout. Delete the static label "Fahrtkostenabrechnug" at the bottom of the page, above the table title. On the screen "Gespeicherte Tabellen", delete the button "Aktuelle Tabelle speichern"
Funny enough, Lovable understood inprecise instructions such as “a bit larger”. Typically the sizes of elements would fit to each other.
For some actions, database tables have to be created or amended. The tool will suggest the needed SQL statements to you and ask for your approval:
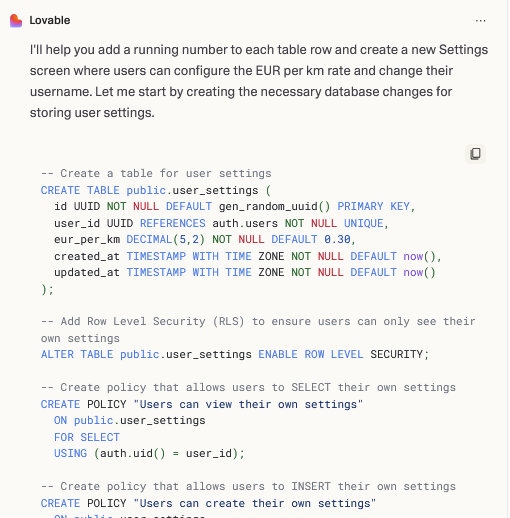
“Please review and approve these SQL commands to create the user settings table.” – Yes, I did… not. It looked okay to me, but obviously I wanted to get by without digging into the code or the needed SQL. So I just confirmed.
Guiding the tool
Most of the prompts led to results, but not always. Sometimes several prompts were needed to fix issues, which is frustrating as each prompt costs a credit. Also, sometimes the prompt was only halfway processed. In other cases there was a message “Build unsuccessful”, which required another prompt to fix it.
So I tried the “human way” after I had wasted a few credits on two problems which were repeatedly not fixed: Just do it again (and blame the tool).
Both problems are still there. Additionally new problems have turned up. You are wasting my credits! I suggest you implement the table saving and loading functionality again from scratch. These are the requirements: when a user logs in for the first time, he sees a blank screen with a hint that he should create his first table. He can then enter rows to the table with the form. Display of the table remains as it is currently. The user can save the table under a freely definable name. This name is the unique key of the table. The table shows up under that name (and only under that name) on the screen with the list of tables. The user can load a table from that screen or delete a table on that screen. When the user logs in and at least one table exists, or when he returns from the table overview screen and did not choose to load a table there, the app shall display that table to him which was updated most recently. If a user clicks on the "Neue Tabelle" button, a blank screen shall appear similar to when creating the first ever table, i.e. a hint that he shall add entries/rows and save the table under a new name.
This worked; after a few more prompts the functionality was working.
Still, some problems were very hard to solve, e.g. providing icons for certain actions. I realized by accident that a prompt led to a correct change in the mobile version, but failed in the desktop version (at which I was working), which created a lot of frustration.
Also, in some cases the tool built errors into the App which I could not understand at all:
There is a major error in the application. Rows (entries) in a table seem to be duplicated when the table is exported as PDF. In fact, I had a table with two different rows which I exported as PDF. Then the table had 8 rows, 4 rows of each kind of the prvious two rows. Fix that.
I needed a few prompts with very precise bug reports to have this fixed. Funny enough, the tool tried to establish some connection with me as the user:
- “I can see the two issues you’re facing”
- “I understand your frustration”
- “Do I know what the issue is? Yes”
Killer features with one prompt only
There are some features which would have cost a lot of effort when coding them manually, but the AI tool did that in a snap:
We need to add language support. Add a language switcher on the login page, e.g. with different flags. For now, German (current language), English, French and Spanish should be supported. The user can choose the language of the application by clicking on the language switcher. Then translate all labels in the application into the respective languages and display the labels in the language chosen by the user. If possible, also change the way that numbers and dates are displayed to the respective format of the main country where the chosen language is spoken.
This worked surprisingly well. I still needed a few prompts to let the App actually save the language setting for a user, and correct some missing translations, but in general this was an easy task.
Similarly, I decided to add instructions to the App – and let the AI tool do it:
Create a separate screen which should contain a step by step help text that explains how to use this website. Link this screen to the help label in the footer and also to the "Hilfe & Anleitung" link when creating a new list. Translate the help text into all supported languages and display it on the new screen in the currently configured language.
This worked quite well, but was too short.
Extend the help screen with better and more detailed explanations, e.g. what this site is used for (i.e. for saving travel costs and exporting them to a PDF document), how to use different lists (e.g. one per month), and more. Be as detailed as possible.
This was an eye-opener for me. The resulting help text is precise and goes far beyond what I expected, e.g. by adding examples for costs per distance etc with actual numbers, which were not stated by me!
Learnings
This experiment created results beyond my expectations. There are a few learnings from this:
- This tool is like your personal developer who listens to you and tries to implement what you state.
- Be very clear with your requirements. The more you know up-front about the intended workflow and screens, the faster (and cheaper) you will be. Building the site as-you-go is possible, but major design reworks have to be made very clear to the tool.
- Be clear with naming screens, fields, labels, buttons etc – you should have a very clear name for each screen element so you can refer to it.
- When running into a loop (i.e. bugs are not fixed despite several clear prompts), it’s best to restart: “Let’s implement the entire functionality of … from scratch: We need…”
- You cannot be pixel-perfect. It tool me several prompts to get a correct size for the mobile screen, and then – out of the blue – the tool decided to re-arrange the menu icons at the top. I still don’t understand why, but the result was okay.
- Major features which are often needed in applications are easy to set up: user management, registration, translation etc.
- There is an issue with data privacy – you have no real control over the database (neither over the code). You shouldn’t use this for critical data.
Altogether this is a very cool and quick way to build simple applications and prototypes! Once again, the result of this experiment can be found here.
What’s next
My daughter is a beta-tester now of this application. I’ll fix errors if needed, and add functions if requested. An interesting step could be to summarize my prompts into one large prompt and feed another AI website builder with it; I might do that just to see the result…
You may also want to have a look at this overview of vibe coding tools.
About me

I am a computer scientist and programmer by education, but have specialised more on specification (and management) in the last 20 years or so. This helped in giving clear instructions to the AI tool. In my day job, I am responsible for functional specification work at coconet, the corporate banking experts. We are building the truly digital and embedded corporate bank of the future!
Leave a Reply